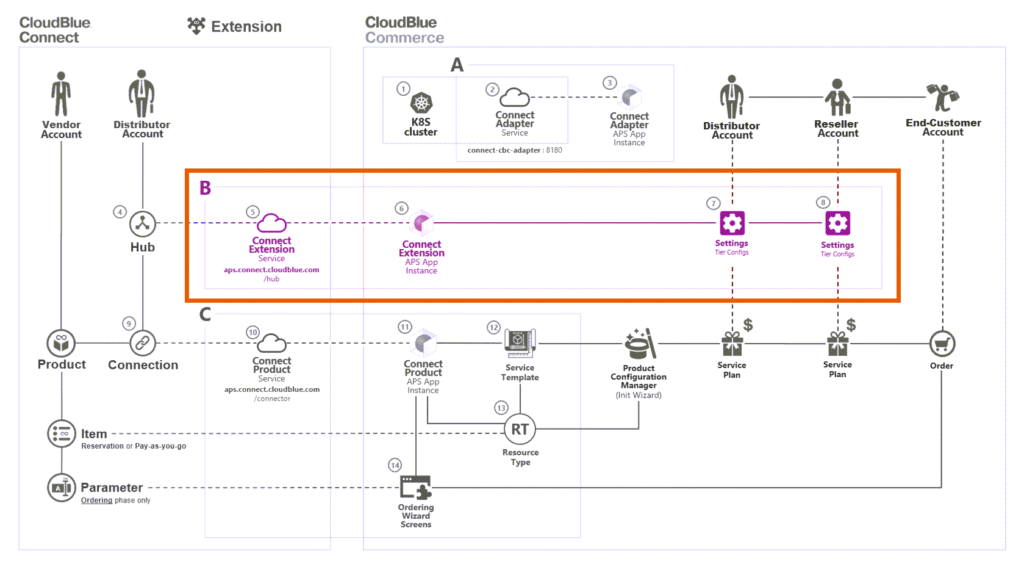
Connect Extension APS Package is a part of the Connect Extension for the CB Commerce that needs to be installed / updated in every CB Commerce instance that is setup to work with Connect, as schematically illustrated and highlighted below:

Extension package provides the following capabilities to the CloudBlue Commerce:
The minimum supported version of the CloudBlue Commerce for the compatibility with Extension APS package is 8.1 (or higher).
For a brief overview and live demo of the Extension package, please refer to the following video:
Extension package requires Adapter Package to be installed first. Please refer to that article for the details.
Open Provider Control Panel of the CloudBlue Commerce, navigate to the Services > Applications screen and click the Import Package button:
Thereafter, specify the following URL and click the Submit button:
As a result of this operation, you should see the “Package successfully scheduled for import” notification. Please wait a few seconds. Upon completion of the importing process, you will be able to proceed to the next step of the configuration process and create APS Application Instance.
In order to create instance of the Extension APS Application, you will need to retrieve Hub-level credentials from the corresponding Hub object details on the Connect Portal.
Access your created hub details screen and switch to the Extension tab. Thereafter, it is required to copy values of the following 3 variables:
These values are essential for APS Application Instance creation as described below.
Once APS Package is imported, please navigate to the System Applications tab, locate the “CloudBlue Connect Extension” package:
Once you access your package from the list, navigate to the APS Application Instances list:
Thereafter, provide the following values:
| Parameter | Value |
|---|---|
| Application API end-point URI | https://aps.connect.cloudblue.com/hub |
| Authentication Type | OAuth |
| Network Access | Proxy |
| OAuth Key | “APS Extension OAuth Key” value from the Hub > Extension details in the Provider Portal of the CloudBlue Connect (described earlier in the article) |
| OAuth Secret | “APS Extension OAuth Secret” value from the Hub > Extension details in the Provider Portal of the CloudBlue Connect (described earlier in the article) |
| Impersonation Level | Yes |
Click “Next” and leave value of the “Hub Identifier” property empty at the next screen:
Click Next once again and create your APS Application Instance.
If everything is done correctly, you should see your new instance with the Ready status in the System Applications list as illustrated in the screenshot below:
Once your APS Application instance is created, 2 new elements will appear in the Services section of the Provider and Reseller Control Panels (versions 1 and 2) of the CloudBlue Commerce:
NOTE: Tier Configurations objects appear in the Settings menu when the following 2 conditions are satisfied:
 Contact us