
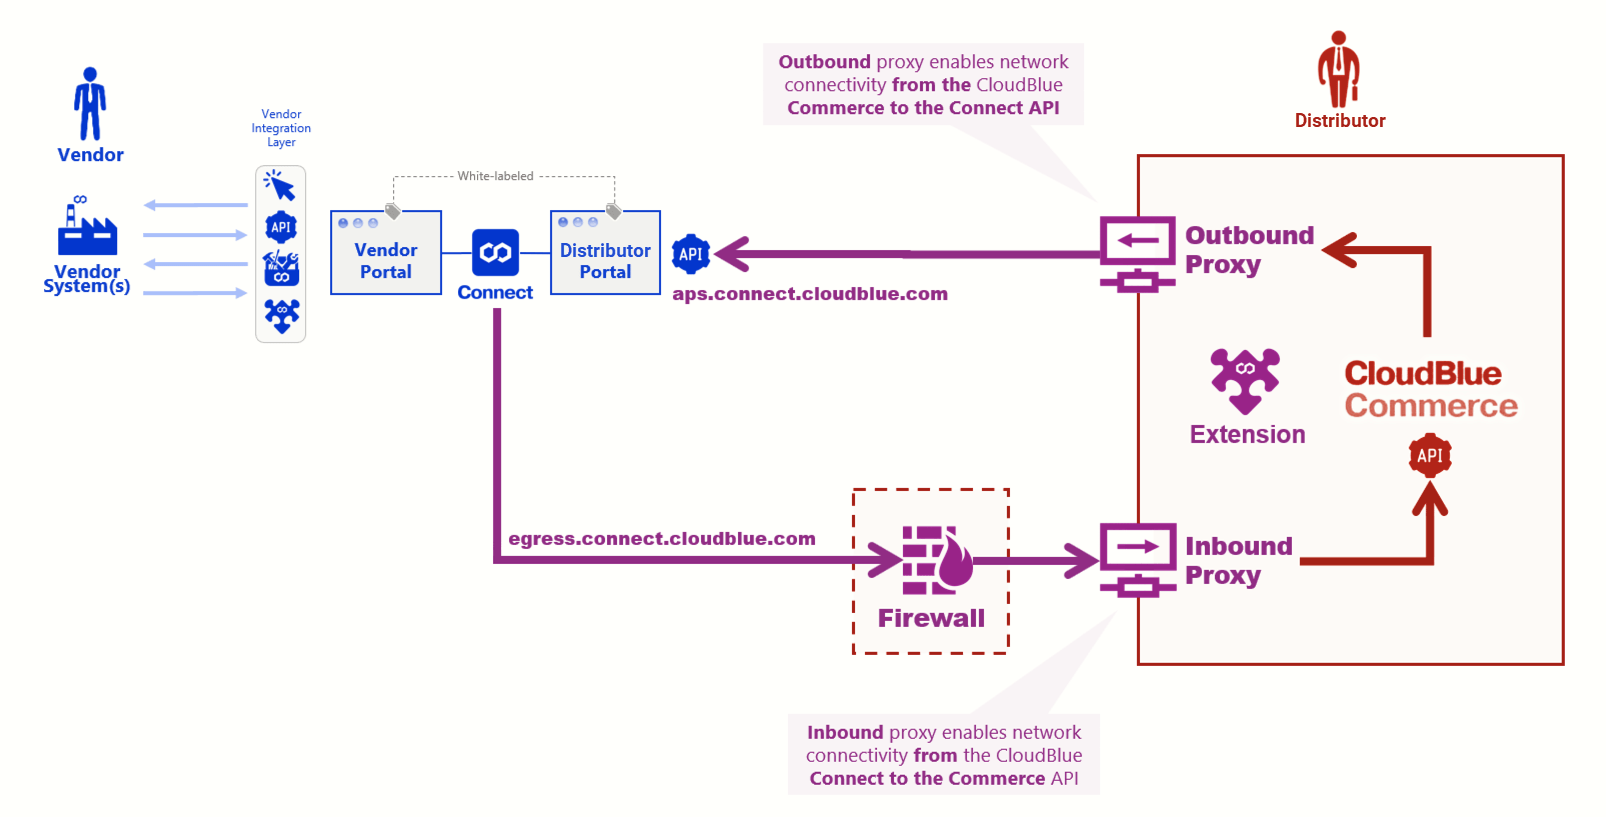
Connect platform runs in the external network and needs to be able to make requests to the APS Controller running on the CB Commerce management node as schematically illustrated below:
In order to provide connectivity to the APS Controller, configure the following settings:
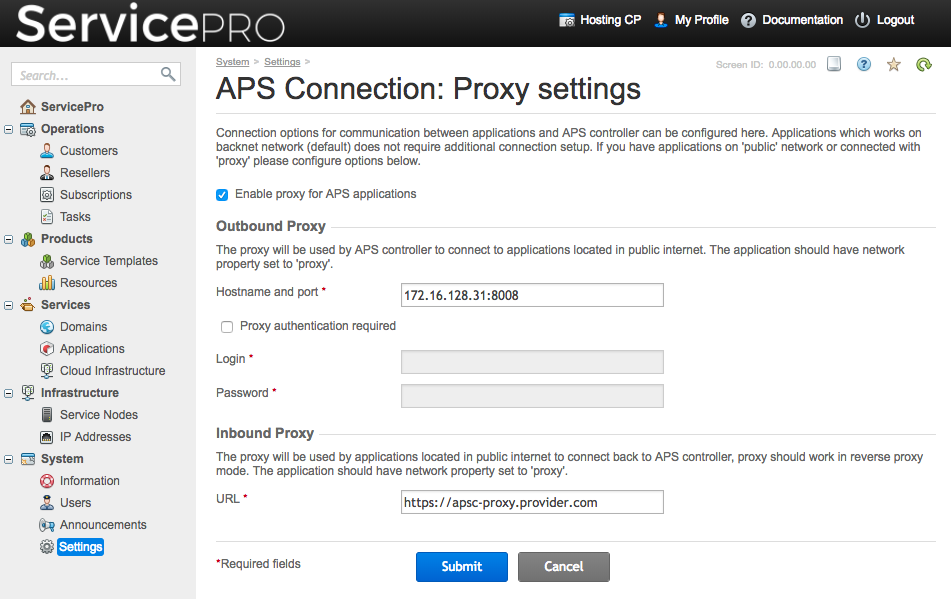
Proxies are configured in the CB Commerce under the System > Settings > APS Connection: Proxy settings menu:

The simplest way to configure outbound proxy in CB Commerce platform is to use tinyproxy, a light-weight proxy that will allow management node and other servers that must interact with external endpoints and has no direct connection to internet. This guide assumes following:
The tinyproxy is available as part of epel-release repository, in case you don’t have it enabled, you can do it with the help of yum:
# yum install -y epel-releaseOnce epel-release is enabled, you can install tinyproxy by using the following command:
# yum install -y tinyproxyOnce the installation is completed, it is required to configure tinyproxy. Edit file /etc/tinyproxy/tinyproxy.conf with the help of vim or another text editor. In the configuration file, please notice this parts:
#
# Port: Specify the port which tinyproxy will listen on.  Please note
# that should you choose to run on a port lower than 1024 you will need
# to start tinyproxy using root.
#
Port 8888
Directive Port exposes where tinyproxy will listen. For our example, let’s change 8888 to 8008
#
# Allow: Customization of authorization controls. If there are any
# access control keywords then the default action is to DENY. Otherwise,
# the default action is ALLOW.
#
# The order of the controls are important. All incoming connections are
# tested against the controls based on order.
#
Allow 127.0.0.1
Allow directive exposes what IPs are allowed to use tinyproxy as proxy, let’s imagine that your backend network is 10.0.0.0/24 and you want to allow all servers in such network to use it. In such case, please introduce an Allow directive like follows:
#
# Allow: Customization of authorization controls. If there are any
# access control keywords then the default action is to DENY. Otherwise,
# the default action is ALLOW.
#
# The order of the controls are important. All incoming connections are
# tested against the controls based on order.
#
Allow 127.0.0.1
Allow 10.0.0.0/24
Multiple allow directives are possible.
Once configuration file is set, you can start tinyproxy service
# systemctl start tinyproxyplease do not forget to enable tinyproxy on system start, to enable it you can run
# systemctl enable tinyproxyNote that tinyproxy is not the only possible solution. Any other service capable of proxying HTTPS traffic will also work (such as https://trafficserver.apache.org). If you have an alternative proxy solution already deployed, it could also be used for proxying APS Controller’s outbound traffic. It is required, however, that this proxy solution does not cache its responses to avoid situations like getting outdated resource usage data, etc.
The inbound gateway (proxy) must:
There are multiple ways to configure an Inbound API Gateway that would meet the above requirements. In this document we provide one example of the Inbound API Gateway configuration with the Nginx (see https://www.nginx.com/) running on a CentOS Virtual Machine. In order to configure in inbound API gateway using Nginx on CentOS, please follow the steps below.
1. Prepare Virtual Machine (VM) running CentOS 7 with two network interfaces
The following network interfaces need to be configured:
2. Install Nginx into the VM
You can do that by enabling the epel-release repository:
[root@inboundPROXY ~]# sudo yum install epel-release
Loaded plugins: fastestmirror, langpacks
Loading mirror speeds from cached hostfile
Resolving Dependencies
--> Running transaction check
---> Package epel-release.noarch 0:7-11 will be installed
--> Finished Dependency Resolution
(output continues)

Installed:
  epel-release.noarch 0:7-11

Complete!
after that, install nginx:
[root@inboundPROXY~]# sudo yum install nginx
Loaded plugins: fastestmirror, langpacks
Resolving Dependencies
--> Running transaction check
---> Package nginx.x86_64 1:1.12.2-2.el7 will be installed

(output continues)

Complete!
3. Configure SSL certificate in Nginx
Please refer to the Nginx (see http://nginx.org/en/docs/http/configuring_https_servers.html) documentation for detailed instructions. You can get a free certificate from Let’s Encrypt to get started, before buying a permanent certificate as demonstrated below. In any case, please ensure you load a valid SSL certificate before continuing.
4. Configure reverse proxy in Nginx
4a. In Nginx configuration file
The file is located at /etc/nginx/nginx.conf find the location of the ‘server’ directive and add the following configuration options: HTML
server { # reverse proxy

    listen 6308 ssl http2 default_server; # could be any inbound port
    listen [::]:6308 ssl http2 default_server; # could be any inbound port
    server_name  _;
    ssl_certificate "/etc/nginx/apsc-proxy.crt";
    ssl_certificate_key "/etc/nginx/apsc-proxy.key";
    ssl_session_cache shared:SSL:1m;
    ssl_session_timeout  10m;
    ssl_ciphers HIGH:!aNULL:!MD5;
    ssl_prefer_server_ciphers on;

    ...
Once ‘server’ section setup is complete, please find the location / directive. By default it will look like this:
location /
{
}
and needs to be updated to include the following settings:
    proxy_pass https://<MN_BACKNET_IP>:6308; # must be port 6308
    proxy_http_version 1.1;
    proxy_redirect off;
    proxy_read_timeout 86400;
    proxy_send_timeout 86400;
    proxy_set_header X-Real-IP          $remote_addr;
    proxy_set_header X-Forwarded-For    $proxy_add_x_forwarded_for;
    proxy_set_header Host               $http_host;
    proxy_set_header X-Forwarded-Proto  $scheme;
}
Please refer to the example configuration file for details:
4b. Reload Nginx
$ service nginx restart
Redirecting to /bin/systemctl restart nginx.service
4c. Verify that the proxy works correctly
You may verify nginx configuration accessing the proxy over a browser to it’s secure location. This will provide a message like the following:
{"error":"APS::Util::Exception","message":"Forbidden"}This message is OK and means that the APS controller on management node is responding. If you get an error page instead of the correct response, it is possible that the outgoing connection is blocked by SELinux. Check /var/log/audit/audit.log for errors; if there are denied messages for Nginx, you can either disable SELinux completely or configure it to allow this outgoing connection for Nginx. There are multiple ways to do this. In this example, we allow nginx to be on permissive policy:
$ semanage permissive -a httpd_tIf that did not help, verify that the APS Controller’s URL as you configured it in proxy_pass in Nginx configuration is accessible from your proxy machine.
It is strongly recommended to assign a valid SSL certificate to the Inbound API Gateway (proxy). There are numerous ways to obtain and assign this certificate. In this example, we explain how to retrieve and assign free SSL to your proxy using https://certbot.eff.org. Your proxy will have to be internet-visible in order to use https://certbot.eff.org.
1. Install certbot-nginx package
$ sudo yum install python2-certbot-nginx2. Start nginx service
If this command fails, ensure that you don’t have apache running on same server
$ service nginx start
Redirecting to /bin/systemctl start nginx.service
3. Enable certbot for nginx
Please answer the questions that script will do and ensure that when asked for the hostname, you specify the public name of your proxy, this one must be publicly reachable
$ sudo certbot --nginxThis command will automatically install the certificate for you on nginx. Please remember that let’s encrypt certificates expires quite often and you may have to enable a cron job to autorenew it. This can be done via inserting a line in crontab like:
0 0,12 * * * python -c 'import random; import time; time.sleep(random.random() * 3600)' && certbot renew For more information on certbot, please refer to the certbot documentation.
Now you can set as outbound proxy the public name using https protocol on the proxy settings configuration section on CB Commerce.
We generally do NOT recommend setting up additional firewall rules as they can significantly complicate migration and upgrade procedures within your infrastructure.
However, if you still want to limit your inbound proxy to only allow connections originated from the Connect platform, please refer to the Firewall Configuration article for details.
 Additional content
  Contact us
